YouTube Marketing - Overview
Launched in May 2005, YouTube allows billions of people to discover, watch and share originally-created videos. YouTube provides a forum for people to connect, inform, and inspire others across the globe and acts as a distribution platform for original content creators and advertisers large and small.
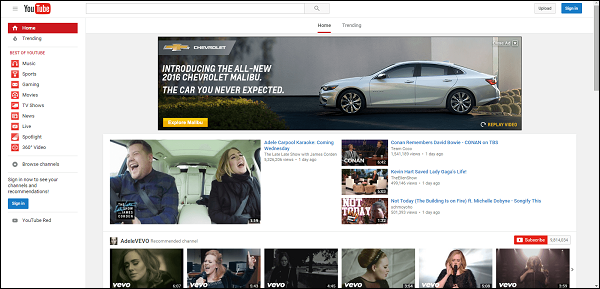
The following screenshot shows how a YouTube page looks like −
Salient Features of YouTube
YouTube is no longer a new media platform, as proven by these stats −
- YouTube has more than 1 billion users
- Every day people watch hundreds of millions of hours on YouTube and generate billions of views
- The number of hours people are watching on YouTube each month is up 50% year over year
- 300 hours of videos are uploaded to YouTube every minute
- ~60% of a creator’s views comes from outside their home country
- YouTube is localized in 75 countries and available in 61 languages
- Half of YouTube views are on mobile devices
- More than a million advertisers are using Google ad platforms, the majority of which are small businesses
The YouTube Advantage
From a business point-of-view, YouTube Marketing has introduced new techniques that many businesses aren't yet exploiting. The following YouTube guide will walk you through these opportunities for marketing on YouTube −
- Assess different ways you can use YouTube for marketing.
- Using YouTube to inform and educate your audience.
- Researching video content ideas.
- Using YouTube to support conversion.
- Leveraging the YouTube community to promote your video.
- Branding your YouTube channel.
- Increasing your reach and visibility.
Important Points to Note
You can keep your focus on the following points to become a YouTube rock-star −
- You need to capture the curiosity of video consumers by creating unconventional content.
- You’ll need to ensure your video is discoverable.
- Consider joining hands with YouTube celebrities to enlist already curated audiences.
- Always ensure that the video links back to your website and includes a call-to-action.
Finally, make sure to be consistent with regular postings to the YouTube channel.
YouTube Marketing - Creating an Account
Creating a YouTube account is free, quick, and painless. To create a YouTube account, just submit some basic information and create a username and password. No need to add your street address or phone number, and you won’t need a credit card.
The following figure shows how to create a Google account if you don’t have one.
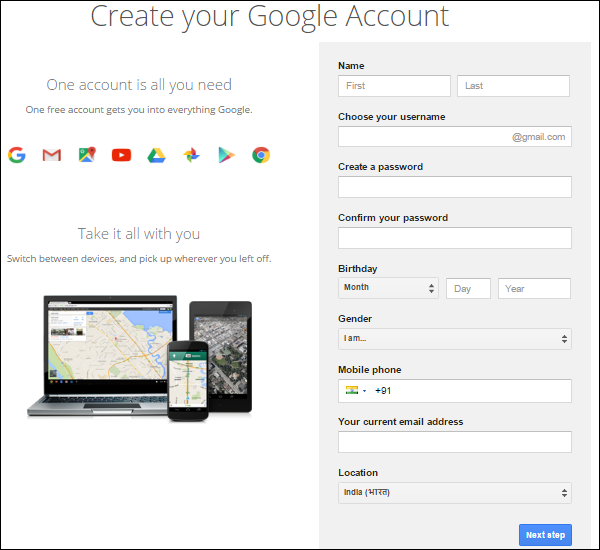
If you already have a Google account, a default account is already created with that signin information. In case you don’t have a Google account, then you can create a YouTube account by following the steps given below.
- Go to YouTube.com and click the Sign Up link. The Sign Up link is at the top-right of the page. This link takes you to the Create Your YouTube Account page.
- Enter your e-mail address and a password. You must enter a valid e-mail address to register.
- Re-type Password and Username fields.
- In the Location drop-down list, select the country where you live, then enter your postal code. This is required only for citizens of the United States, United Kingdom, and Canada.
- Click to select your gender and enter your date of birth. No one under the age of 13 will be given permission by YouTube to create an account.
- Type the characters (letters and numbers) from the colored box into the Word Verification field. If you can’t read the characters, click the New Image link next to the box to view a different image and color scheme.
- Check or uncheck the next box. (Let others find my channel on YouTube if they have my email address) This gives you some control over who sees your videos.
- Check the Terms of Use, Privacy Policy box after you read all the legalese.
- Click the Create My Account button. If you leave any fields empty or if you choose a username that’s taken already, YouTube refreshes the page with red warning notes identifying the fields that need to be corrected before you can register.
After filling all the details, you get a Gmail account through which you would have access to YouTube also.
YouTube Marketing - Create Creative Video
Ready to grow and sustain a loyal audience on YouTube? Start with a Creative foundation and strong, workable ideas.
When deciding what content will work best on YouTube, this is a great list of ideas or questions to ask yourself before the creation process begins.
- Shareable − Will viewers share your videos?
- Conversational − Is there an element of speaking directly to the audience?
- Interactive − Can the audience interact with the content?
- Consistent − Are there consistent elements to each episode?
- Targeted − Is there a distinct audience your videos are targeting?
- Discoverable − Will viewers discover your videos through search?
- Accessible − Can a new viewer appreciate every episode?
- Sustainable − If your audience loves it, can you make more of it?
- Collaborative − Is there space for guests in your episodes?
- Inspired − Are your videos coming from a place of true passion?
If your content idea passes the test, it’s now time to decide what equipment you’ll use to capture the video. Choices include everything from your mobile phone, a webcam, a handheld camcorder, or software that captures activity on your computer.

You’ll also want a script. Even if you are very comfortable on camera, it will help keep the flow of the video moving and make sure you don’t miss any key talking points.
Now it’s time to record your footage. Once you've settled on an idea for your video, perform whatever tasks you must to set up and prepare, then record the video. Capture multiple takes and more footage than you think you’ll need. Be sure to film in good light and speak loudly and clearly.
The following screenshot shows an interface of the Movie Maker tool.
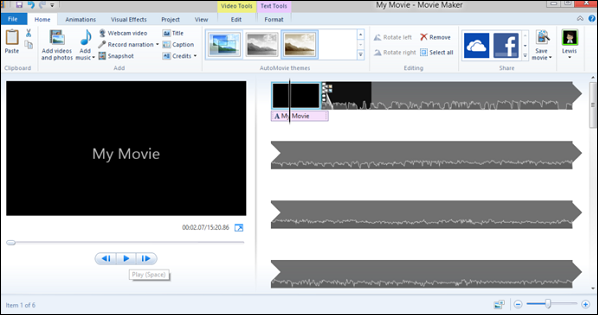
Once captured, you’ll need to transfer the video file either directly to YouTube for editing purposes or to your computer so that you may use your editing software of choice. From there, you’ll have infinite number of tools to enhance the visuals of your video, add music, cut and clip, and finally publish and promote on YouTube!
YouTube Marketing - Creating a Channel
The first step in creating your YouTube channel is selecting a channel name. This name may live with your channel forever so make sure that resonates with your branding. Does it clearly communicate your channel concept? Does it relate to the other names of your social media channels?
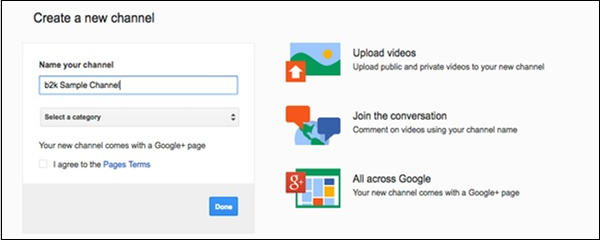
To begin, go to YouTube and sign in with your Google account, Go into settings (the wheel icon found in the menu at the top right), and you’ll be walked through the steps which give you the option to create or rename your channel and see your channel ID. Once you’ve taken this important first step you’re ready to upload!!
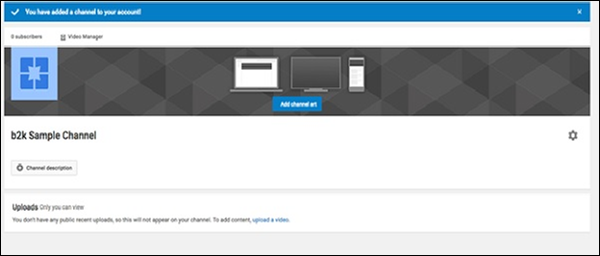
There are some account settings that you may want to update straightaway, like connecting your social media accounts, setting privacy levels for your videos, and deciding how you'd like to receive notifications. Also, in order to enable features like custom thumbnails, you’ll want to verify your channel with Google.
Channel Description Box
The YouTube description box might be the most undervalued player on your video marketing team. Many brands, vloggers, business channels, and other less-formally produced channels will skip the description box as unnecessary or simply not worth the energy… so wrong!
Truth is, the description box is a crucial player in your YouTube marketing strategy because its contents (along with your titles, tags, and captions) help YouTube to determine if and where your videos rank on search or as related videos.
The description box is shown in the following screenshot.
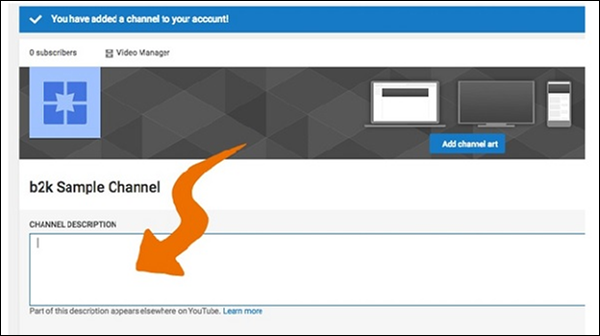
Your channel description is shown on the above tab and gives viewers a short overview of what they can expect from your channel. It also shows up when users mouse over your channel icon on a watch page. You can include up to one thousand characters and add links too.
On the upload page, you’ll have your first opportunity to add a description box to a new video. You can always add this later but ideally, your description should be written before the video is made public.
The first 5 lines are essential for two reasons. They are −
- The first two lines of the description box are displayed next to your video in search and when posted on social media.
- The first 5 lines of the description are included beneath your video but above the “read more” tab.
Always include a link to your website in the first two lines. Beyond that, the description box should be an index to related content, but not a dump for every web link where you’ve ever had an affiliate account with.
Use all of those 1000 characters you are allowed! Write 100- 200 words in addition to your first 5 lines and your social media & related links. That will easily bring your word count up to 300 and show Google that you have a meaty product.
Descriptions should be optimized for search so be sure to place your main keywords in the description box at 1-2% saturation. You can also use related keywords in the description to try and rank for more terms.
Setup Channel Background
You can design your own YouTube profile and customize it in a variety of ways. If you design your YouTube page, it will really reflect your brand’s personality. It’s an easy process.
It can be easily done by following the steps given below −
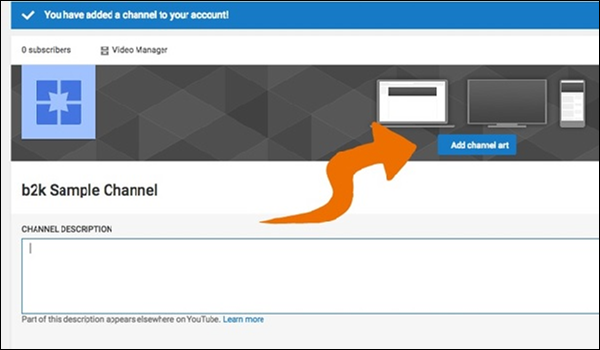
- Go to Add Channel Art.
- The screen will have your profile picture and a blank box behind it.
- On the box will be a smaller box that says "Add Channel Art." Click on it and a new page will load.
The following screenshot shows the "add channel art" option in the window.
Select a photo. At the center of the screen is a blue box that says “Select a photo from your computer.” Select the box and a windows box will pop up with all of your pictures.
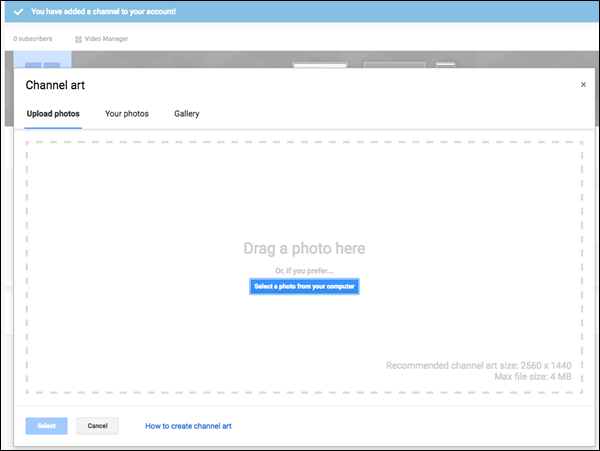
Scroll through the pictures, and once you find the picture you want to use as your background, double-click it to save it. Set the photo as background. Click the blue “Select” button on the bottom of the screen. This will save the picture to your YouTube channel background.
The recommended size is 2560×1440 pixels and can be no larger than 4 MB.
The minimum width is 2048×1152 pix. This is the "safe area," where text and logos are guaranteed not to be cut off when displayed on different devices. The maximum width is 2560×423 pix. This means that the "safe area" is always visible; the areas to each side of the channel art are visible depending on the viewer’s browser size.
YouTube Marketing - Channel Branding
Your channel is like a storefront. Give it the right look to show off your style, and brand it like a pro.
Focus on the content
Your brand should correspond to the type of content you produce. You’ll want it to convey the essence of what viewers can expect to see now and in the future.
Keep it familiar
Branding should represent your channel’s style in a logical and consistent fashion. It should communicate your channel’s key message so that viewers know what to expect. Keep it simple. Make sure all of your videos, including your channel trailer, align with your branding.
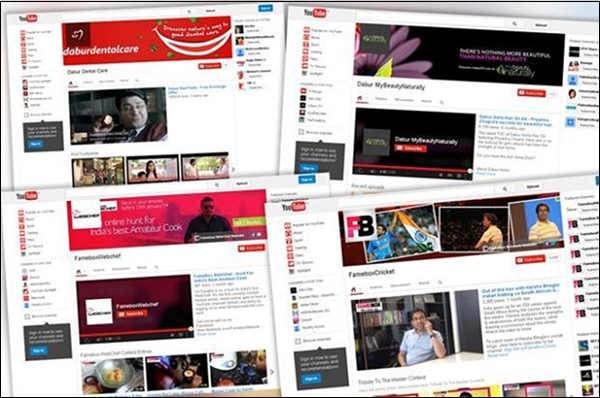
Make it discoverable
Branding should make it easier for viewers to find your videos and channel. Tag your videos using consistent metadata (text-based information such as titles or themes) and post your video or channel across social media platforms. This will help viewers find your channel more easily when they search for it.
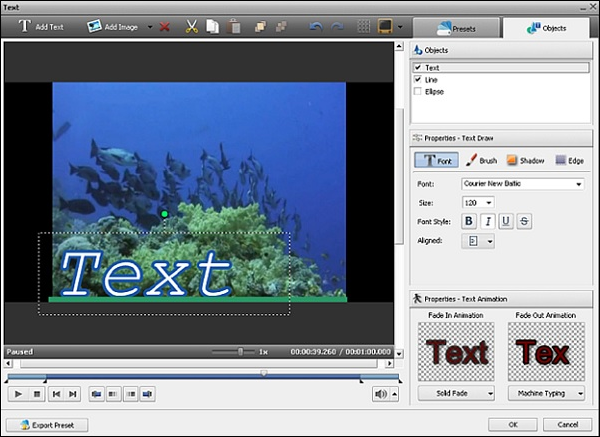
In addition to the above tips, it’s important also that you keep your brand’s logo and visual identity across the entire channel. Three branding tips that are critical include −
- Ensuring that every video has your watermark.
- Ensure that your YouTube Channel Icon is properly branded (with your logo or headshot).
- Ensure that your branding is represented in the Channel Art on YouTube.
Create Video Thumbnails
Video thumbnails let people see a quick snapshot of your video. After your video is finished uploading, you'll be able to choose a thumbnail from the default three options YouTube automatically generates. To select the one that you'd like to use, simply click the thumbnail and click save changes.
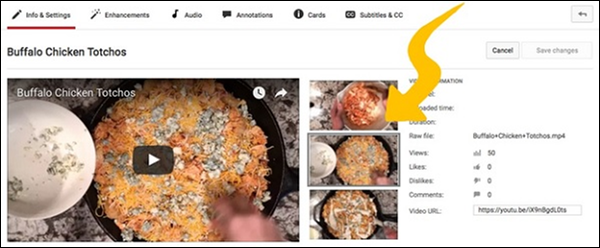
Here's how to change a thumbnail at any time −
- Go to your channel Video Manager.
- Click Edit for the corresponding video you'd like to change.
Custom video thumbnails
If your account is verified and in good standing, you may have the ability to upload custom thumbnails for your video uploads.
Uploading custom thumbnails
To upload a custom thumbnail when you upload a video, follow the following steps.
- Record or upload your video.
- At the end of the video processing stage in the upload interface, you will see an option to choose a Custom thumbnail under the "Video thumbnails" section.
To upload a custom thumbnail for an existing video −
- Go to your channel Video Manager.
- Locate a video and click the Edit button.
- Click the Custom thumbnail button and upload a thumbnail.
- Once the thumbnail is uploaded, don't forget to click the "Save Changes" button.
Your custom thumbnail image should be as large as possible, as the image will also be used as the preview image in the embedded player.
We recommend your custom thumbnails −
- Have a resolution of 1280×720 (with minimum width of 640 pixels).
- Be uploaded in image formats such as .JPG, .GIF, .BMP, or .PNG.
- Remain under the 2MB limit.
- Try to use a 16:9 aspect ratio as it's the most used in YouTube players and previews.
YouTube Marketing - Create Video Playlists
Imagine that your channel is like an online store, with well-organized, smartly-curated displays that showcase your different types of content. Whether you create videos with different themes or you curate videos from others, keep your collections organized with playlists and sections to get people to watch more of your channel and communicate why they should subscribe.
Collecting and sharing videos from across YouTube on your channel can also help you offer even more value to your fans, and establish your reputation as a trendsetter.
A playlist is an ordered list of videos that you create, often with a specific theme i.e. a YouTube Food Channel may be sorted by “Breakfast Recipes” or “Dinner Recipes” playlists. The items in a playlist can be videos collected from your channel or other channels.
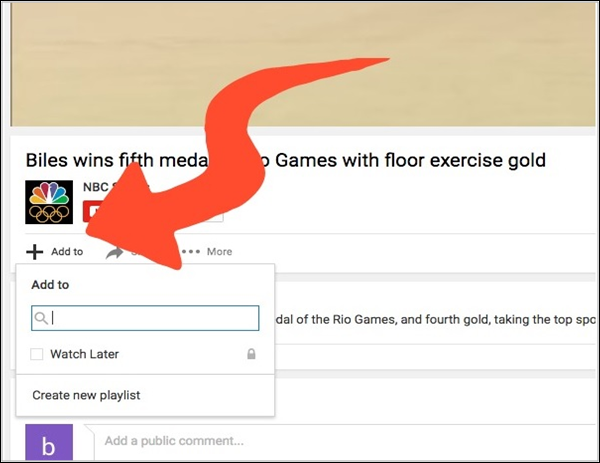
Either way, playlists can help you position yourself as a trendsetter, introducing your fans to more of what they love.
Playlists can showcase your channel’s personality and ultimately, your creativity. Great playlists can increase watch time and create another asset that will appear in search results, and in suggested videos. You can even make a playlist around a big or current event, like the Olympics or assemble the “best of” around a theme that resonates with your viewers. If your channel features multiple hosts or personalities, you can use playlists to give each host their own space, too.
To determine the best way to create and/or delete your playlists, visit: https://support.google.com/youtube/answer/57792?rd=1
Then, select the instructions that correspond to the operating system that you are using.
YouTube Marketing - Video Sharing
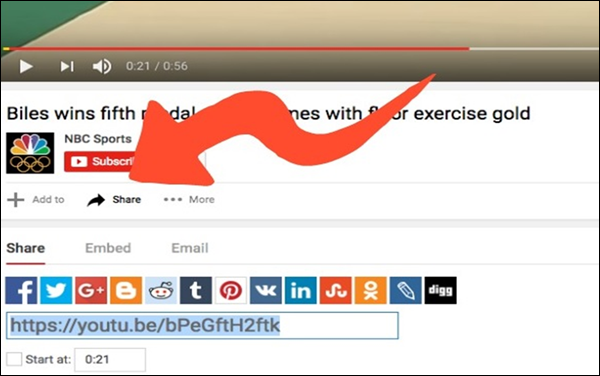
There are several ways to share a video on YouTube. As YouTube instructs, start watching a video and click Share under the video. Three tabs will open with different sharing options. Let’s discuss these three tabs.
Share Tab
In this tab, you’ll see a link that you can copy and paste somewhere else, like in an email message.
- Start at − To link to a specific part of the video, check this box and enter the start time before you copy the link. For example, to start the video at 2 minutes and 30 seconds, check the box and enter “2:30”.
- Social networks − Click on a social network icon (e.g. Facebook, Twitter) to share the video there.
Embed Tab
This tab provides code to embed the video on a website.
Email Tab
YouTube will send an email to the email addresses you enter. If the recipient doesn’t receive the video, ask them to check their social network folder, spam folder, or add noreply@youtube.com to their address book and filter exception list.
YouTube Marketing - Deleting a Video
Note that if you delete a YouTube video, the action is permanent and you cannot ever restore the video via YouTube or recover any interaction (likes or comments). Also note that you can only remove videos that you have personally uploaded.
Now, as we had already warned you, if you still want to delete your video, follow these steps.
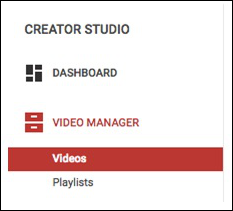
- To delete a YouTube Video, sign into YouTube.
- Go to the Video Manager from the Creator Studio.
- Check the boxes beside the video(s) that you want to delete.
- Click the Actions drop-down menu and select Delete.
Note that these instructions are for the YouTube website. It is currently not possible to delete a video via YouTube mobile site. You can also delete videos via the Android and iOS application. However the process is different for both mobile applications.
Immediately after deleting a video, no YouTube viewers will be able to see it, although it may still show up in search results for a brief period of time.
YouTube Marketing - Hide a Video
If you want to hide your video, but expecting it to be still there on YouTube, go for this option. There are three different privacy settings for any YouTube video you upload.
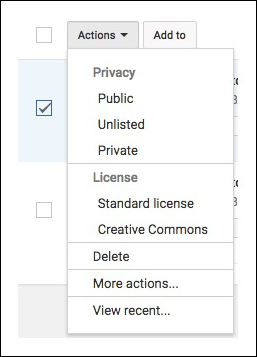
- Public − Anyone can view the video and it will show up in any relevant search results.
- Private − Only viewers whom you have selected may view the video, but they must have YouTube accounts to view the video.
- Unlisted − Only those viewers with whom you’ve shared the link may view the video and the video will not show up in search results. You can share with viewers who do not have a YouTube account.
To change the privacy settings of a video you have already published, follow the steps given below −
- Sign into YouTube. Go to the Video Manager from the Creator Studio.
- Check the box beside the video(s) whose privacy you want to change.
- Select Public, Unlisted, or Private, depending on your preference.
Sharing Unlisted and Private Videos
Sharing Unlisted Videos
Follow the steps given below to share an unlisted video −
- Click the blue link icon to the right of the video you want to share in the Video Manager (just above video views).
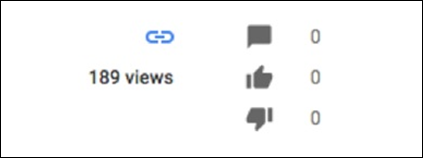
- Copy the link on the right side of the page beside “Video URL” and share via text or email with those who you would like to view your video.
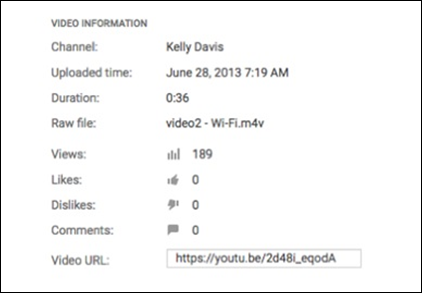
Sharing Private Videos
Note that you may share a private video with a maximum of 50 YouTube users. Here is how it is done −
- Click Edit, to the right of the video you want to share, in the Video Manager.
- Under the privacy setting, select Share.
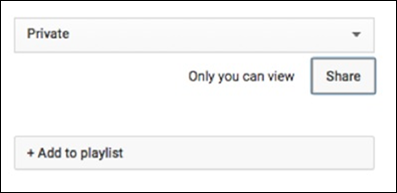
- Type the email address/es of any YouTube users with whom you want to share the private video. Your recipients will need to sign into their YouTube account to view the video.
White Hat SEO for Videos
To understand how to optimize rankings for your YouTube video, you first need to understand how YouTube ranks the videos. The most important aspects of your video YouTube considers in ranking are (in no particular order) are −
- Title
- Keywords in description
- Tags
- Audience retention (how long viewers view your video)
- Views
- Subscribers
- Likes and dislikes
- Comments
Here are some strategies to make the most of these video attributes to take your videos to a higher rank −
Title
Be specific but also interesting. Use relevant keywords that will allow YouTube crawlers to identify your video for relevant searches. But also consider how interesting your title is.
- Example 1 − Make your video stand out (interesting, but few relevant keywords)
- Example 2 − How to use SEO for YouTube (relevant keywords, but not very interesting)
- Example 3 − How to use SEO for YouTube videos to stand out (relevant keywords AND interesting)
You can use up to 100 characters in your YouTube video titles, but only 50-60 words show up in search results. Use those characters wisely. Also, don’t be afraid to change your title if it’s not performing well, which you can do at any time!
Keywords in description
The description is another opportunity to get your video noticed by honing in on additional key words that would not fit into your title.
Be specific. Be relevant. But do not overreach. In other words, only use keywords that truly describe the content of your video. Google and YouTube crawlers are constantly updated to get the best results for search engines.
Tags
Use the keywords you have mentioned in the description and any more (up to 20 that are relevant and clue YouTube in to what your video is about so they can help viewers find you.
Audience retention
This is just a fancy way to say how long viewers actually watch your video. A video that is viewed in its entirety will outweigh another video in this category that has viewers who lose interest after a few seconds. The best way to get great audience retention is to have a great video, plain and simple. Be concise and make sure there is no lag time. Appropriate editing is a must.
Views
The more people who watch your video, the higher your video will rank on YouTube. The best way to get more views is to promote, promote, promote. Share your video on social media. Promote upcoming videos at the end of the videos you post (“Look out next week for a new video that will get you knew YouTube subscribers instantly!”).
Email your video to your social circle and especially to your list of subscribers. If you have a blog, embed the video. You can even run ads to promote your video on YouTube.
Subscribers
The more of an authority you are on YouTube, the heavier the weight your videos will have. In other words, the more subscribers you have, the higher YouTube will rank your individual videos. The two best ways to get subscribers is to produce high quality, entertaining videos and to ask viewers to subscribe. You can verbally ask them at the end of each video or in the descriptions. A watermark on your video asking viewers to subscribe is also a popular strategy.
Likes and Dislikes
This more passive form of interaction also factors into your ranking. Similarly to subscribers and comments, simply asking people to like is an effective way to increase likes.
Comments
There are two basic strategies for increasing comments besides creating a great video. Ask people to leave a comment, or more specifically, ask a question at the end of your video to compel viewers to leave a comment to answer your question.
YouTube Marketing - Choosing a Video Title
We’ve covered some basic ways to increase SEO using a smart YouTube title. In this chapter, we will highlight some more ways to strategically optimize your YouTube video titles.
Put your keywords at the front of your title
Let’s take our relevant and interesting title mentioned before -- How to optimize SEO for YouTube videos to stand out – and adjust it to put the key words at the beginning. It becomes SEO for Videos: How to Stand Out.
Use a keyword tool
Use a good keyword tool to generate keyword ideas to incorporate in your title. Keywords allow viewers to find your video based on keywords for which they’re searching within YouTube. So it’s important that you use as many relevant keywords as possible when assigning them to your video.
Consider using a number in the title
This is something you’ll have to consider before shooting the video so it makes sense with your content. Titles with a number such as “SEO for Videos: 5 Ways to Stand Out” will rank higher typically than titles without a number.
Additionally, YouTube suggests that your title get to the point fast, include your channel/show name and episode number, and be concise.
Add Video Keywords
Keywords are used in the title, in the description, and in tags. Crawlers ranking your video cannot actually view or listen to your video, so they are depending on the keywords in the title, description, and tags to explain what our video is about.
- Use your most important key words (pick two or three that work well together) for your title.
- There are various sources that claim the benefits of both a short or long description. But it is most important that your description gives a concise explanation of what your video is about so that a viewer knows whether or not your video gives them what they are looking for in the search results.
- Use your most important key words in the very beginning of the description, since the description will be abbreviated in the search results. You should definitely reuse the keywords in the tile both in the description and in the tags.
- The tags should be an exhaustive list of keywords (up to 20) that are relevant to your video content.
Optimized Video Filename
First, this cannot be done in YouTube. If you want to change the filename of your video, you must change it on your computer prior to uploading it to YouTube.
Second, whether or not your video contains keywords does not impact your video’s reach. YouTube and Google crawlers do not care what your video’s filename is. This is a myth that apparently came about when YouTube changed its algorithm and users were scrambling to make the most with keywords. Google has stated that this is not relevant when crawlers are scanning for keywords.
However, there is no harm in changing your filename. This can make it easier for you to find your videos. But don’t expect the change to give you an SEO advantage.
YouTube Marketing - Add Video Annotation
Annotations allow you to add to the video experience by layering text, links, and hotspots on your video. This helps add interest, increase engagement, and adds information to your video.
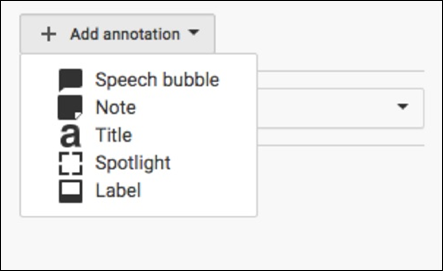
To add video annotation, follow the steps given here −
- Sign into your YouTube account.
- Go to the Video Manager within Creator Studio.
- On the video you want to add annotation, click the down arrow to the right of the Edit button. Select Annotations.
- Click the Add Annotation button on the right.
- Click Apply Changes when you've completed your annotations.
YouTube Marketing - Promoting a Video
After making a video and editing it with necessary changes, the important part is promoting the video. While there are many companies who you can pay to promote your YouTube videos, there are several ways you can self-promote at no cost.
Give your video an appropriate title and description
YouTube users find videos by typing keywords into the search bar. There may be hundreds or even thousands of YouTube users looking for the very video you have created and uploaded. But they will never find your video if you don’t properly explain what your video is about in the title and description.
Share your video with your own social circle
Self-promoting starts with you own social network so do not be afraid to reach out to friends and family asking them to check out your video, as well as like and comment on the video to get a higher ranking and be more likely to show up in search results.

Encourage interaction by viewers
It sounds so simple, but by simply asking viewers a question or asking them to like or comment on your video will often result in more interaction. Interaction is key to getting more people to find and view your YouTube video.
Work all social media angles
The first step here is having a presence across several social media outlets (Facebook, Pinterest, Instagram, Twitter, etc.). Then you can cross promote your social media accounts, including your YouTube channel or videos. By linking to your videos on Twitter, you may open a whole new world of YouTube videos to your Twitter followers, for example.
Embed your video into your website and/or blog
This is similar to working your social media angles. If you already have an audience on the Internet, share your videos with that audience.
Email your video out in your newsletter
It is important to use opt-in emails, if you’re not already doing this, so that subscribers can easily unsubscribe.
Find new viewers with YouTube Fan Finder
This free tool is discussed next.
Collaborate and/or cross promote with another channel
Creating a mutually beneficial relationship with another YouTube video creator allows you both to get access to each other’s audiences. In turn, this means you may be able to attract their fans to being viewers of your own videos.
Use AdWords for videos through Google
You can learn more about this in this Ad words description and tutorial, but ultimately, AdWords is a way for you to pay for your video to show up when someone searches for keywords that apply to your video using the Google search engine.
YouTube Marketing - Fan Finder
According to YouTube, the YouTube Fan Finder finds and connects your channel to new fans, at no cost to you.
You create a small channel ad to promote your channel that is filled with clips from your own YouTube videos. You then submit this channel ad to the Fan Finder program. If accepted, your channel ad will be shown across different YouTube videos.

It works as an ad at the beginning of other videos that YouTube thinks is relevant to your intended audience. Viewers can skip after the first five seconds or continue watching. In other words, you have five seconds to catch the attention of your potential new YouTube viewer and/or subscriber.
To make the most of this program, follow the following steps.
- Keep your video short (30-60 seconds).
- Make your video interesting.
- Include a great call to action.
- Include your channel name so you’re easy to find.
- Monitor your five ads to see which are performing best and use the ones that get the best results.
- Make sure your Fan Finder video follows all guidelines to optimize your chances of getting approved for the program.
YouTube Marketing - Handling Comments
Once you start promoting your video, you get both appraisals and comments. As an appraisal would cheer you up, a comment may withdraw your smile. But trolling is quite common on social media and hence, try to take those comments in a positive note and respond softly.
Managing comments on your video is important in interacting with your viewers. Viewers may have their own insight that add value to your video. They may have questions or different perspectives to consider. Managing your comments creates a dialogue instead of a one-way street of information.
Let us discuss some of the ways in which you can manage comments on your videos.
Reply to comments
Simply click on Reply to reply to a comment.

Change the priority of comments
You can choose to allow newest comments to be at the top of the page (directly beneath the video) or top comments shown first. Top comments are those from the video creator and those that have been voted up by other viewers.
Remove, report, or hide comments
To manage a comment, click the arrow in the upper right corner of the comment and choose to either remove the comment, report spam or abuse, or hide from channel. The hide from channel option will block the YouTube user from posting comment on any video on your channel. This is not permanent and which you can reverse in the future, if you choose to do so.
Turn off discussion
In some situations, you may choose to turn off comments on your channel. To do this −
- Sign into your YouTube account.
- Select My Channel in the upper left corner.
- Click Settings under your channel banner.
- Turn the Show Discussion tab OFF to stop all comments or you can also change comments so that they won’t be displayed until approved.
Manage Negative Comments
At some point, all popular YouTube channels face a negative comment. There are three ways to deal with this −
- Remove, report, or hide comments (please see description above)
- Ignore the comment
- Reply
Best practices typically favor replying over other strategies, except in extreme situations (like threats or divulging personal information). Here are some best practices in replying to a negative comment.
Take time to respond
Your initial reaction may be “What a jerk! How dare you say that?” but that’s not constructive. Take some time to construct a well-thought out reply that is communicated with dignity both for yourself and the commenter.

Give them the benefit of the doubt
Comments on social media channels come with no context, no facial cues, and no tone. Don’t assume that they meant their comment in a negative way. They may have no idea that their comment is considered “negative” to you.
Don’t argue
It’s typically in your best interest, even when dealing with argumentative people, to engage in an argument. Your reply is visible to everyone else who looks at the comments on your video. Think about the reputation you are trying to create and how your reply will look to other people who want to comment on your video.
Separate constructive criticism from negativity
There are some YouTube users who thrive on negativity and there are others who genuinely want to contribute to the conversation, even if they don’t see eye-to-eye with you. Make sure you aren’t lumping these two types of people together. Respond to viewers offering constructive criticism with grace and appreciation that they are adding to the discussion. Welcome divergent viewpoints when they’re written respectfully.
Don’t feed the trolls
There are people on the Internet that seek pleasure in being argumentative. Engaging with them can be exhausting and is never productive. If you think you may be dealing with an Internet troll, tread carefully and don’t be afraid to disengage (i.e. ignore them).
YouTube Marketing - Monetize Your Video
When your YouTube videos begin attracting a large audience, you can turn those clips into an extra source of revenue by enabling monetization on your account.
Monetization is a simple process that starts once you to agree to YouTube's terms and conditions for advertising. Following this, you can allow ads to run with your videos, and YouTube will share of portion of the ad revenue with you.
Here are the steps that you can follow to monetize your YouTube account −
- Sign in to your YouTube account, and then click your name in the sidebar to open your YouTube profile page.
- Click the "Video Manager" link, click "Channel Settings" and then click "Monetization" to open the Monetization page. This page contains information on the types of videos that are eligible for ads. Generally, you can allow ads only on videos you create yourself, and you must have written permission to use any copyrighted material in the video.
- Click the "Enable My Account" button at the top of the page, and then check the boxes indicating agreement with YouTube's terms and conditions.
- Click "I accept" to enable monetization for your account. Even though monetization is now enabled for your account, you won't produce any revenue until you enable advertisements for individual videos.
- Click "Channel Settings" in the sidebar and then click "Verify." Enter your phone number, select either "Voice Call" or "SMS," and then click "Submit." Google calls or texts you with a six-digit verification code that you must enter on the next screen. Once you submit the code, your account is verified and you can monetize your videos.
- Click "Video Manager" in the sidebar to return to the Uploads page. Check the box next to one or more of your videos, and then select "Monetize" from the "Actions" menu at the top of the list.
- Select the types of ads you want to allow with your videos. YouTube will always display banner ads above or to the side of your videos, but you can also allow preview ads to appear before a video, or allow overlay ads to appear as transparencies in the lower portion of your video.
- Click "Monetize" once you make your selections. YouTube will preview your ads to make sure they meet the requirements for monetization, and then approve or reject them in about 48 hours.
- In some cases YouTube may ask you for written documentation that you are the copyright holder of the material in the video. Your videos will be labeled "Monetized" on your Uploads page once they are accepted.
YouTube Marketing - Marketing Tricks
While promoting a YouTube video, you can keep some basic points in mind to increase the visibility of your videos.
Use Engaging Video Thumbnails
Believe it or not, I still see many not using this when creating videos on YouTube. The truth is you need a way to grab the viewers’ attention from the search results to get them to even watch your video.
Your Link Must Contain (http ://)
It seems simple but many people miss the boat on this. If you want people to click off to your website, you must make sure the link you provide is clickable. If you don’t do this, you will lose lots of traffic to your site.
For example, when you put a link such as "www.yourwebsite.com" in the description of your video, then it would not be clickable.
Instead, your link should be "http://yourwebsite.com". It will become an actual clickable link where people can visit your site.
Add Each Video You Upload to a Keyword Based Playlist
This is an important point that many people don’t know. Just keep in mind that everything you do should be with the idea of driving traffic and views to your videos.
The best way to do this is create highly focused videos based on relevant keywords. But keyword focused videos need to be added to keyword focused “Playlists”. Why? Because playlists can rank in the search engines.
Always Include a ‘Call to Action’ in Your Videos
Every video you create should have a call to action of some sort. Tell your audience what you want them to do at the end of the video. (See section on YouTube Video Call Button)
Check Your Audio Quality
It is important that you check the audio quality of your videos. Always keep in mind that while the video itself is important, so is the audio. Keeping your audio in mind when creating good videos only adds to the overall experience of the viewer. Getting a highquality mic nowadays is not hard and it’s pretty inexpensive.
YouTube Marketing - Safety Settings
Restricted Mode
When it comes to viewing videos on YouTube, an account owner can disable or enable certain types of videos. The Safety Setting is usually applied to videos that younger children and teenagers should not be viewing. When turning on this setting, it is called Restricted Mode. YouTube uses community flagging, age-restrictions, and other signals to identify and filter out potentially inappropriate content.
According to YouTube, "Restricted Mode works on the browser or device level, so you must turn it on for each browser you use. If your browser supports multiple profiles, you must enable it for each profile. If you want Restricted Mode to stay enabled for anyone using this browser, you can lock Restricted Mode."
The procedure to lock or unlock the restricted mode is as follows −
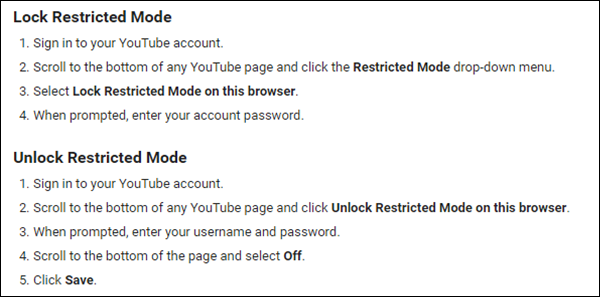
The following screenshot shows how you can turn the restricted mode ON or OFF.
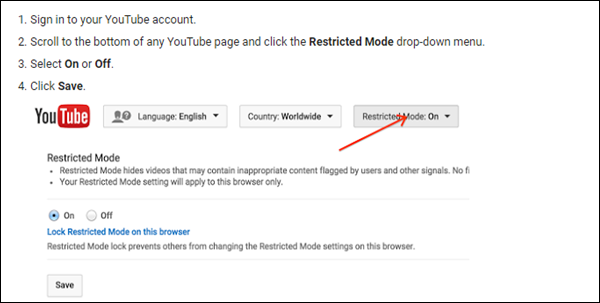
Once enabled, the Restricted Mode remains ON regardless of whether you are logged in or not (and if another person logs into a different YouTube account). Make sure to sign out of the account that turned the Restricted Mode ON so that other users of the computer can’t change the setting.
YouTube Marketing - Videos Admin
Google now enables you to link your Google+ pages to your YouTube accounts and channels. This means that one person could manage up to 50 YouTube accounts. On the other hand, it means that collaborative YouTube Channels can have up to 50 admins, no longer requiring you to share a single password with your entire team.
To take advantage of the new features and admin controls, you must visit your YouTube account settings and select “Connect with a Google+ page.” From there, you can choose to link a new Google+ Page, an existing Google+ Page that is already owned or managed by the YouTube account, or linking a Google+ profile.

Adding additional admins is a pretty simple process. Once your accounts are linked, go to the channel’s account settings, click add or remove managers, and enter the email address of the person you want to add. Remember, only the owner of the Google+ page can add or remove managers.
If you’re managing more than one channel, you can only use one at a time. This means that you’ll have to switch to the channel you want to manage by clicking on your name or icon in the top right corner of YouTube and clicking “switch account.” There you’ll find a list including your personal Google identity as well as any channels linked to Google+ Pages that you manage.
YouTube Marketing - Video Transcripts
As a content creator, you like to cater to each and every individual of your current and potential audience. One way of doing this, is video transcripts. Transcripts are just like captions. They contain, in a text form, only what is said in the video.
Follow the steps given below to add Subtitles and Closed Captions −
- Go to your Video Manager by clicking your account in the top right → Create Studio → Video Manager → Videos.
- Next to the video you want to add captions or subtitles to, click the drop-down menu next to the Edit button.
- Select Subtitles and CC.
- Click the Add new subtitles or CC button.
- Choose how you want to add your edit Subtitles or Closed Captions to your video.
Use Automatic Captioning
YouTube can use speech recognition technology to automatically create captions for your videos. If automatic captions are available, they will automatically be published on the video.
Automatic captions are available in English, French, German, Italian, Dutch, Spanish, Japanese, Korean, Portuguese, and Russian.
Format Your Transcript File
Type the text of what was said in your video and save it as a plain text file (.txt). You can convert other formats (like Microsoft Word, HTML, PDF) into a plain text file or you can use native programs on your computer like TextEdit or Notepad.
In order to get the best results, use these formatting tips −
- Use a blank line to force the start of a new caption.
- Use square brackets to designate background sound. For example, [music] or [laughter].
- Add >> to identify speakers or change of speaker.
Here is an example of what your transcript file might look like −

YouTube Marketing - Video Call Button
When you put together a video, you have two major outcomes you are looking for. The first is that people view that video, and do all the things associated with viewing it (commenting for engagement, sharing for visibility, etc.). The second is that they view other videos that you have put out, or other content you have produced on that and other websites. To make this happen, you need a call-to-action button.
When you apply it to your video, it is known as a Call to Action overlay. These are the little ads that come up at the bottom of the video player during your clip.
Making an overlay for your YouTube video is very simple.
- Sign into your account where the video has been uploaded, or where you intend to upload the video.
- Once a video has been successfully uploaded, go to the Account located at the top of your dashboard.
- There should be a section titled My Videos, and under it, Uploaded Videos. Click this link and it will give you a thumbnail version of each clip that has been uploaded to your account. To each thumbnail will be an Edit button.
- Editing the video will give you a Call to Action Overlay section with a series of text boxes. Fill these out with the necessary information, then click Save Changes.
YouTube Marketing - Partner Program
The YouTube Partner Program lets creators monetize content on YouTube in many ways, including advertisements, paid subscriptions, and merchandise.
Becoming a YouTube Partner costs nothing and is totally optional. One of the biggest benefits in becoming a YouTube Partner is that Google handles all the advertising placement, revenue collections and your payments.
Once you become a part of the program −

- Google matches up your videos with advertisers, decides what ads will appear, and keeps track of all traffic (views), as well as ad responses.
- YouTube then pays you accordingly for your participation in the Partner program. There's no need for you to find, solicit or manage the advertisers. This becomes an automated process.
Benefits of the YouTube Partner Program
The YouTube Partner Program will help you to −
- Expand your earning potential − YouTube is the largest online video community in the world, enabling you to reach a global audience with your monetized content.
- Gain flexibility through a non-exclusive agreement − YouTube doesn't restrict where partners can upload and distribute content, so you can monetize your content on YouTube and other platforms.
- Track and manage your performance − Use YouTube Analytics to get reports to help you track your YouTube performance and earnings and gain insights that can help you improve.
Eligibility criteria and sign up
Check to see if your YouTube channel meets the YouTube Partner Program criteria, and then follow the steps to become a partner −
- The program is available in your country.
- You upload original, quality content that is advertiser-friendly.
- Your video content complies with the YouTube Terms of Service and Community Guidelines.
- You've reviewed the YouTube copyright education materials.
YouTube Marketing - Analytics
You can monitor the performance of your channel and videos with up-to-date metrics and reports on your dedicated YouTube Analytics page. You have the option to choose from different report types, like the Watch time, Traffic sources, and Demographics reports.
You can go directly to youtube.com/analytics or follow the steps below −
- Sign in to your YouTube account and click your account icon > Creator Studio.
- On the left, select Analytics.
- Choose the report you want to view.
How to Setup Analytics Default Settings
These settings are applied on the user level and can be overwritten when looking at individual reports. Pull from categories such as currency, time periods, content and watch time units.
You can go directly to youtube.com/analytics or follow the steps below to choose your settings −
- Sign in to your YouTube account and click your account icon > Creator Studio.
- On the left, select Analytics.
- In the top right, click the settings icon.
- Choose your default setting for the following fields: Currency, Time Periods, Default Content, and Unit for Watch Time.
Let us now try to understand the various reports that you can access from YouTube Analytics to analyze the popularity of your videos and channels.
Overview Report
According to YouTube, the Overview report is a high-level summary of how your content is doing on YouTube. Use it to quickly see some basic performance metrics for your YouTube content.
You'll see the following sections in the Overview report. Clicking on a card will bring you to a more detailed report for that section.
- Performance metrics − Summarizes watch time, views, and earnings (if applicable) for the selected content.
- Engagement metrics − Displays the most relevant data for the different engagement criteria, such as likes, dislikes, comments, shares, and favorites.
- Top 10 content − Shows the top 10 pieces of content for your channel, such as channels, playlists, and assets, according to watch time.
- Demographics − Gathers information on the gender and the location of viewers.
- Discovery − Summarizes the metrics for top playback locations and top traffic sources by watch time.”
Revenue Reports
Revenue reports are only available for YouTube Partners who have an associated AdSense account. You can see your Revenue Report by following the steps given below −
- Log in to your YouTube account.
- At the top right, select your account > Creator Studio.
- In the left menu, click Analytics > Revenue Report.
You can use the Revenue Report to see −
- Revenue-related details for the four partner content types − all claimed content, claimed partner and premium user uploaded content, claimed standard user uploaded content, and all partner uploaded content (you'll see the word "partner" next to available metrics)
- Revenue-related details at the channel and video levels (available metrics are shown as "your" revenue)
- Estimated revenue − Net revenue from all Google-sold advertising sources for the selected date range and region.
- Estimated ad revenue − Estimated revenue from auction-sold advertising via AdSense and reserved-sold advertising via DoubleClick, for the selected date and region.
- Revenue derived from transactions, like paid content and Fan Funding (if applicable)
- Revenue derived from YouTube Red (if applicable)
Ad Rates Report
Ad Rates Report is available for YouTube Partners only who have access to revenue data in their account. It provides data on YouTube ad revenue, estimated monetized playbacks, cost per mile (CPMs), and ad impressions for the ads that run on your content. Use the report to assess how different ad types are performing over time relative to one another.
To see your Ads rates report, you can go directly to the Ad rates report or follow the steps below −
- Log in to your YouTube account.
- At the top right, select your account > Creator Studio.
- In the left menu, click Analytics > Ad rates.
Note − The values in the Ad rates report will not match up to the numbers in the Revenue report. The Ad rates report shows gross figures (the amount the advertisers paid to run the ads). The Revenue report shows net revenue (the amount you will be paid), which factors in revenue sharing and fractional ownership.”
Watch Time Report
Watch time helps video creators understand the quality of their videos and how well different videos engage viewers. Metrics include not only watch time but also related metrics like average view duration, average percentage viewed, and audience retention. Use these metrics to learn how engaged your viewers are and get insights into how to get them interested in watching more.
Use the Watch Time Report to see data about watch time and views. The report shows the following data collected from YouTube.com, the embedded player, and mobile YouTube apps.
To see your Watch Time Report, you can follow the steps below −
- Log in to your YouTube account.
- At the top right, select your account > Creator Studio.
- In the left menu, click Analytics > Ad rates.
To download the report, click Export report in the top right.
How to Use the Watch Time Report
At the top of the report, you'll see watch time and the number of views. You can use the tabs under the graph to view the data by dimensions like content type, geography, date, subscription status, YouTube product, and subtitles or closed captions.
You can choose from a variety of other Watch Time reports such as −
- Audience Retention − Get an overall measure of how well your video keeps its audience.
- Playback Locations − Shows the pages or sites that your videos are being viewed on.
- Traffic Sources − Shows the sites and YouTube features that viewers use to find your content.
- Devices − Gives you information on the different devices and operating systems that viewers use to watch your videos.
- Demographics − Helps you understand the age range and gender distribution of your audience. This data is based on logged-in viewers from all devices.
Engagement Reports
Engagement reports are a great way to show how a user interacts with your video. Sort by −
- Subscriber information
- Likes and dislikes
- Favorites
- Video is playlists
- Comments
- Sharing
- Annotations
- Cards
Real-Time Reports
Real-time reports are used to see estimated views data for the last five published videos. You can also see this data in reports for individual videos. Content creators can take a peek at early insights into the performance of the most recently published videos and might help you change their promotion strategy for the better.
To see your real-time report, follow the steps below −
- Log in to your YouTube account.
- At the top right, select your account > Creator Studio.
- In the left menu, click Analytics > Realtime.
In real-time report, you can see two graphs −
- Hour-by-hour data − Available for a sliding window of 2 days. It shows the view count for the last 48 hours, showing the peaks and valleys that come with viewership over that time span.
- Minute-by-minute data − Available for a sliding window of 1 hour. It's the graph that will likely have you coming back, as it shows activity over the previous 60 minutes.
YouTube creators will find these stats incredibly helpful in that the report gives early insights on a video's performance and can be used to adjust how the video is being promoted.
